Clown Drawing Step by Step
A clown is a comic entertainer who typically wears exaggerated makeup, colorful wig, and eccentric outfit. Clowns not only fascinate little children, but people of all ages remain entertained with their ludicrous antics. They are most commonly seen in circus. Learn this blog and visit the latest drawing ideas like tweety bird drawing for kids.
The extreme popularity of clowns has made it a highly-requested tutorial. To meet our beloved readers’ demands, we have created a step-by-step tutorial on how to draw a clown.
This guide consists of 9 easy instructions paired with simple illustrations, making it a lot easier for you to follow the steps one by one. Have fun and use your creativity and artistic skills!
Step 1 - clown drawing
Start by drawing a standing oval shape in the middle of your paper. This outlines the shape of the clown’s head.
Avoid pressing down too hard with your pencil when drawing an outline. It’s important to draw with light strokes so you can easily remove any parts of the outline that you may no longer need later on.
To make sure that the head of the clown will be drawn in the center, you can make use of reference lines. Simply draw an intersecting horizontal and vertical line and use these lines as a guide.
The point where the two lines meet marks the center point, which is the spot where you should draw the outline of the clown’s head.
Step 2 – Create an Outline of the Clown’s Head
Draw two semicircles one each side of the clown’s head. This forms the pair of ears of the clown. Make sure that the form of the ears are uniform. Don’t forget to add two small curved lines on each ear to create the inside or inner ear. This also adds detail on your drawing, making it appear more realistic.
Step 3 – Next, Draw the Hat the Clown is Wearing
Clowns typically wear a hat, so that’s exactly what we’ll be drawing in this step. The hat can be created by simply drawing a semicircle with a slightly flat bottom at the top of the clown’s head. This creates the crown of the hat.
Then, draw an oval shape surrounding the bottom part of the crown to form the brim. Afterwards, draw a line across the bottom part of the crown to create the hat band surrounding the crown.
Don’t forget to erase any part from the outline of the head overlapping within the hat!
Step 4 – Afterwards, Draw the Clown’s Hair
For the clown’s hair, you can draw any hairstyle you like! Clowns typically have funny hairstyles, so keep that in mind when drawing the hair of the clown. As you can see in the illustration, we’ve kept the clown’s hair simple yet distinct.
To create the afro hairstyle shown above,draw a scalloped line forming a sideways triangular shape on each side of the clown’s head. This forms the big chunk of pointed hair of the clown.
Step 5 – Then, Draw the Eyebrows of the Clown
Draw two curved line shapes below the hat to create the clown’s pair of arched eyebrows. Make sure that the eyebrows are uniform and drawn within the same level.
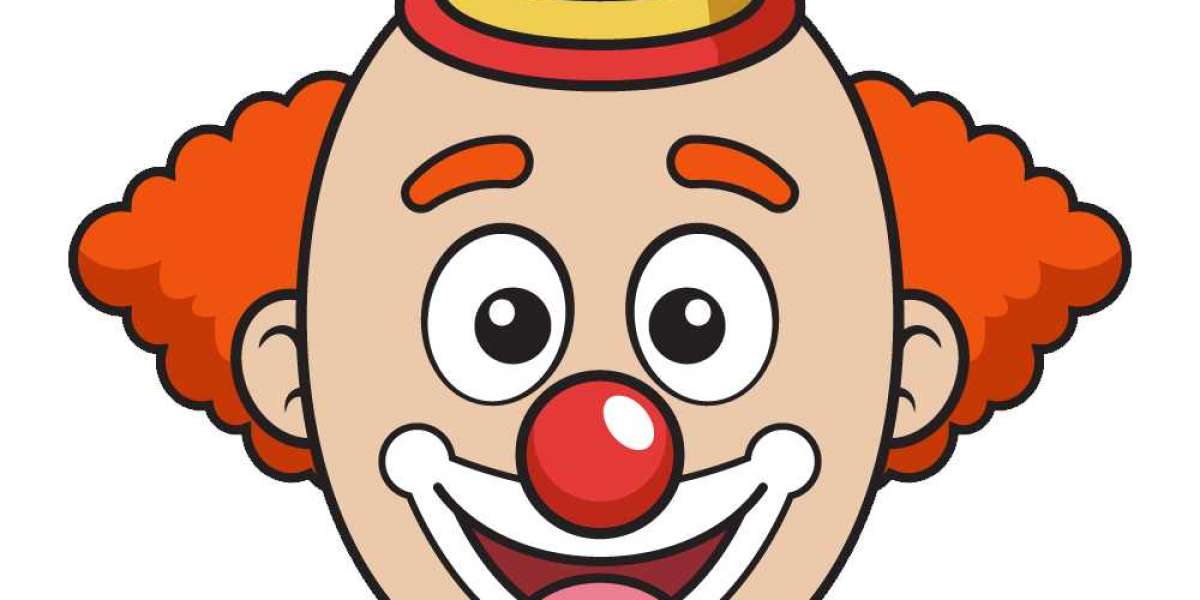
Step 6 – Now, Draw the Clown’s Round Nose
Draw a perfect circle on the bottom middle part of the clown’s face. This creates a huge, round nose—one of a clown’s most distinct physical features!
Step 7 – Put a Wide Smile on the Clown’s Face
Right underneath the nose, draw two curved lines on top of the other to create a smiling mouth. Afterwards, draw an outline outside the mouth following its form. This creates the illusion of smudged lipstick surrounding the clown’s mouth.
Step 8 – Style and Design the Clown’s Appearance
In this step, you can style the clown however you like! As shown in the illustration above, we just added a little flower at the back of the clown’s head. Feel free to add more patterns on the hat or some decorations on the hair.
Don’t worry about exaggerating the design! As a matter of fact, the more creative the designs are, the more fun the clown looks!
Step 9 – Add the Eyes to Complete the Look
Draw a huge standing oval shape right underneath each eyebrow. Then, within each eye, draw a small circle with another tiny circle inside to create the pupil and the iris respectively.
Add shade into the entire pupil while leaving out the iris unshaded. This creates a dramatic “sparkling eyes” effect. Now that we’ve successfully drawn a clown, it’s time for the most exciting part, which is coloring your drawing!
This is the part where you can showcase your artistic skills, especially your ability to mix and match various colors. The colors you will be using for the clown is entirely up to you! But here’s a tip that you may find useful: mix the colors white, yellow, red, and blue to create a skin tone color.
But depending on the complexion you’re trying to achieve, you may need more of a certain color.